Can you replace an Apple Watch band?
Yes, you can certainly replace an Apple Watch band, and it’s a straightforward process designed by Apple to facilitate customization and personalization. The versatility of the Apple Watch is one of its hallmarks, allowing users to change bands to suit different occasions, activities, or simply to match their personal style. Whether you’re dressing up for a special event, gearing up for a sports activity, or just wanting a change, swapping your Apple Watch band is a hassle-free way to express your unique style.
Apple has designed the watch and bands with a simple release mechanism that does not require any special tools. Each side of the Apple Watch features a small button that, when pressed, releases the band, allowing you to slide it out and replace it with a new one. This design ensures that changing your Apple Watch band is not only possible but also safe and secure. With a wide variety of band materials and styles available from both Apple and third-party manufacturers, the possibilities for customization are nearly endless.
Choosing the Right Band for Your Apple Watch
When deciding to replace your Apple Watch band, consider both the band size and material to ensure a perfect fit and comfortable experience. Apple provides clear guidelines on band compatibility based on the size of your watch and offers bands in materials like silicone, leather, and stainless steel. It’s important to select a band that not only fits your personal style but also the activities you plan to engage in while wearing your watch.
Is there a trick to removing Apple Watch band?
Removing an Apple Watch band might seem straightforward, but there are indeed a few tricks that can make the process smoother. Whether it’s your first time switching out bands or you’re an experienced user looking for a more efficient technique, understanding the proper way to remove your Apple Watch band is essential. Not only does it ensure the longevity of your device and its accessories, but it also helps prevent any unwanted damage or scratches.
Steps to Safely Remove Your Apple Watch Band
First and foremost, it’s important to start by powering down your Apple Watch to avoid any accidental inputs. Then, lay your Apple Watch face down on a soft, lint-free cloth or surface to prevent scratching the screen or casing. Some might overlook the significance of a protective surface, but it’s a simple trick that makes a big difference in maintaining your device’s pristine condition.
Identifying the Band Release Buttons
Every Apple Watch model comes equipped with band release buttons, located on the back of the watch, that are specifically designed for band removal. However, these buttons can sometimes be stiff, especially if the watch is new or the band hasn’t been changed in a while. A helpful trick is to gently press down on the button with the pad of your finger rather than using your fingernail. This method ensures that you’re applying a uniform pressure across the button, which makes it easier to release the band.
In conclusion, while removing an Apple Watch band is a relatively simple process, applying these small tricks can enhance your experience. By following the proper steps and utilizing gentle techniques, you can swiftly change bands while keeping your device in top condition.
How often should you change Apple Watch band?
Deciding how often to change your Apple Watch band largely comes down to personal preference and usage. However, there are certain factors that can guide your decision. It’s not just about aesthetics; functionality and comfort play pivotal roles too. Whether you’re an active user who participates in sports or someone who uses the watch more casually, each scenario will have different needs and thus, different timelines for changing the watch band.
Consider Your Lifestyle
Your lifestyle is a significant determinant in deciding the frequency of changing your Apple Watch band. Active users might find that sweat and constant movement can wear down the material more quickly, necessitating more frequent changes. On the other hand, casual users might prioritize style over function and choose to switch out bands to match different outfits or occasions. Understanding the demands of your daily activities will help you establish a timeline that suits your needs.
Material Matters
The material of your Apple Watch band also affects how often it should be changed. Silicone bands, for example, are durable and resistant to sweat, making them ideal for exercise but might require regular cleaning. Leather bands, while stylish, can wear down and discolor more quickly, especially if frequently exposed to water or sweat. Stainless steel bands offer longevity but can be prone to scratches. Considering the material can guide you toward a more informed decision regarding the lifespan of your band.
No se han encontrado productos.
How to attach a new Apple Watch band?
Changing your Apple Watch band is a simple way to personalize your device and adapt it to different occasions, whether you’re going for a workout, attending a formal event, or just seeking a fresh look. Here’s how to attach a new band with ease.
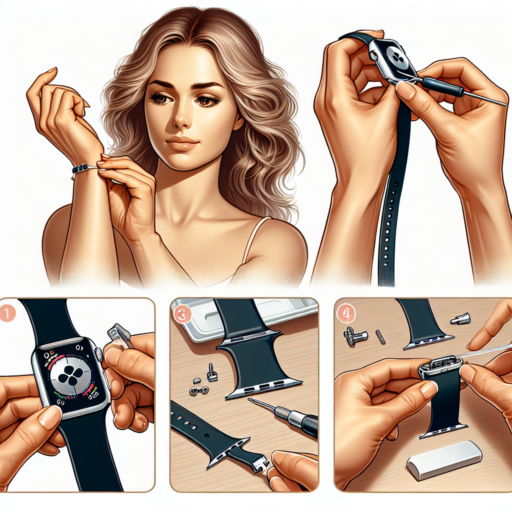
Step 1: Remove the Old Apple Watch Band
Before you can attach a new band to your Apple Watch, you must first remove the existing one. Start by powering down your device to avoid accidental inputs. Turn your Apple Watch over, and look for the band release buttons — there’s one for each band piece. Press and hold the button, then slide the band across to remove it. If you’re having trouble, ensure you’re pressing down firmly and sliding the band out completely straight.
Step 2: Attach the New Band
With the old band removed, it’s time to attach the new one. Take your new Apple Watch band and align it with the slots on your Apple Watch. Make sure to match the band piece with the correct size slot on your watch. Slide the new band in until you feel a click, indicating the band is securely attached. If the band doesn’t slide in easily, double-check its orientation and that you’ve chosen the correct size to match your Apple Watch model.
It’s crucial to ensure that the new band is firmly attached before wrapping it around your wrist. A correctly attached band will not slide out unless the release button is pressed. Give your Apple Watch a gentle shake to verify that everything is securely in place. With these steps, you’ve successfully customized your device with a new band, ready for any occasion.