No se han encontrado productos.
How do I set up my Armitron watch?
Setting up your Armitron watch can be a straightforward process once you understand the key steps involved. Whether you’ve just purchased your first Armitron watch or you’re resetting it, the setup process requires attention to detail to ensure your watch operates correctly and keeps accurate time. In addition to providing you with the time, many Armitron watches offer additional functionalities such as alarms, stopwatches, and backlights, making the setup process crucial for optimizing your watch’s features.
Understanding Your Armitron Watch Buttons
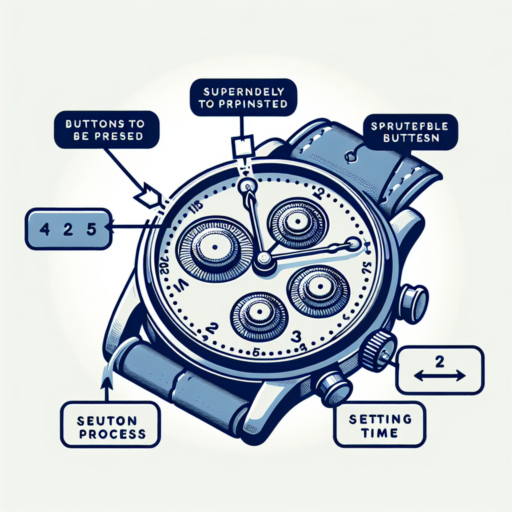
Before diving into the setup process, familiarize yourself with the buttons on your Armitron watch. Typically, there are four buttons labeled as A, B, C, and D situated around the watch face. Button A is usually found at the top left, B at the top right, C at the bottom left, and D at the bottom right. Each button has a specific function that allows you to adjust various settings such as time, date, and alarm, contributing to a successful setup.
Setting the Time and Date
To begin setting your Armitron watch, press and hold the Set button (often Button A) until the seconds flash, indicating you are in setting mode. Use the Mode button (commonly Button B) to cycle through the settings such as hours, minutes, date, month, and day of the week. Adjust these settings by pressing the Adjust button (usually Button C). Once you’ve set the correct time and date, press the Set button again to exit setting mode. This sequence may vary slightly depending on your model, so consulting your watch’s manual is recommended for specific instructions.
Remember, setting up your Armitron watch correctly is essential not just for accurate timekeeping but also for taking full advantage of its features. With a proper setup, your watch can serve as a reliable accessory for your daily needs, complementing your style while ensuring you stay on schedule.
How to set a digital touch screen watch?
Understanding Your Digital Touch Screen Watch
Before diving into the setting process, it’s crucial to familiarize yourself with your digital touch screen watch. These modern timepieces come equipped with various features beyond just telling time, such as alarms, stopwatches, and sometimes even health tracking capabilities. Identifying these features on your watch’s interface can make the setting process smoother and more intuitive.
Step-by-Step Guide to Setting Your Watch
To begin setting your digital touch screen watch, start by waking the screen. This is usually done by a gentle tap or a specific gesture outlined in your watch’s manual. Once activated, look for the settings icon or menu. This is often represented by a gear or tools symbol. Tapping this icon will bring you into the settings menu, where you can adjust the time, date, and other personalized settings. For precise adjustments, some watches may require you to hold down on the screen or a specific area to enter the time-setting mode. In this mode, swipe or tap to select the correct hours, minutes, and date.
Tips for a Hassle-Free Setting Experience
- Charge Your Watch: Ensure your watch is fully charged before attempting to set it. This prevents it from turning off mid-setup.
- Refer to the Manual: Each digital touch screen watch has its unique interface. Consulting the manual can provide shortcuts and tips to streamline the setting process.
- Use a Stylus: If your fingers are too big or you find the touch screen unresponsive, a stylus can offer more precise control.
Remember, the key to successfully setting your digital touch screen watch lies in patience and familiarization with its features and settings. With these steps, you’ll have your watch set up in no time.
How do I set the time on my watch?
Setting the time on your watch might seem like a daunting task initially, especially if you are dealing with a new or complex model. However, the process is usually straightforward once you familiarize yourself with your watch’s particular quirks. Watches come in a variety of types, including analog, digital, and smartwatches, each requiring a slightly different approach. This guide will walk you through the general steps to ensure you can efficiently set the time, keeping you punctual for all your commitments.
Analog Watches
For analog watches, the process typically involves pulling out the crown located on the side of the watch. Once pulled out, you can turn the crown until the hands on the watch face display the correct time. It is essential to push the crown back in to start the watch moving again and secure its water-resistant properties.
Digital Watches
Setting the time on a digital watch often requires a different approach. Initially, you need to locate the ‘Mode’ button to cycle through the watch’s various features until you find the time-setting function. In most cases, using a combination of the ‘Set’ or ‘Adjust’ button along with the ‘Mode’ button will allow you to change the hours, minutes, and sometimes even the seconds and date. Remember to confirm your adjustments, often done by pressing the ‘Mode’ button again or the ‘Set’ button, depending on your watch model.
No matter the type of watch you own, setting the time is a basic yet crucial task to ensure your timepiece not only reflects the correct time but also operates at its best. With these simple steps, adjusting the time on your watch should become a quick and painless process.
How to set time on Casio watch with four buttons?
Setting the time on a Casio watch with four buttons may initially seem daunting, but it is actually a straightforward process once you understand the function of each button. Casio watches are renowned for their reliability and multifunctionality, making them a popular choice for watch enthusiasts around the world. We’ll guide you through the essential steps to adjust the time, ensuring your Casio watch is set accurately.
Identify the Buttons on Your Casio Watch
Before you can set the time, it’s crucial to identify what each of the four buttons on your Casio watch does. Typically, these buttons are located on the edge of the watch face and are labeled or referred to as A, B, C, and D in the manual. Generally, Button A is found at the top left, Button B at the top right, Button C at the bottom left, and Button D at the bottom right. Each button has a specific function, such as adjusting the hours, minutes, seconds, and accessing different modes or settings within the watch.
Step-by-Step Guide to Setting the Time
To set the time on your Casio watch, you first need to enter the time-setting mode. Press and hold Button A until the seconds start to blink, indicating that you are in setting mode. Next, use Button C to reset the seconds to 00 if you wish to synchronize the time with a reference clock precisely. To adjust the hours and minutes, press Button B to move to the next field (hours will blink first, then minutes). Use Button D to increase the value of the field you are setting. Once you have set the correct hours and minutes, press Button A again to exit the setting mode, and your Casio watch will begin to keep time with the new settings.